Managed Identities Quick Wins
- Introduction
- Prerequisites
- Azure App Services
- Kubernetes / AKS / EKS / GKE
- Container Apps
- Azure SQL Databases
- Conclusion
Introduction
Before becoming a DevOps engineer and writing my first line of code, I was already responsible for managing infrastructure and applications. One common challenge I faced was handling secrets securely. At the time, the only option I knew was to store them as plain text in environment variables. Unfortunately, the developers were reluctant to spend time integrating external services like Key Vault and Managed Identities into the application code. Since I lacked development experience, I couldn’t implement these solutions myself.
Determined to solve this problem without altering the code or relying on the developers, I aimed to achieve a 100% infrastructure level solution and I succeeded!
Prerequisites
The following examples use the public Docker image hashicorp/http-echo:1.0.0 from Docker Hub. This is a simple application that displays the value of the ECHO_TEXT environment variable. In my examples, the value of this variable will be retrieved from a Key Vault and displayed on the main page after accessing deployed service
Managed Identity
To proceed, you’ll need a managed identity. A user-assigned managed identity is the best choice in this case, as it can be assigned to multiple services and its lifecycle can be separated from the other resources. In this article, I will create user-managed identity and assign it to Azure App Service, an Azure Kubernetes Service cluster, and Azure Container Apps. However, if you prefer using system-assigned identities, they will work as well.
There are multiple ways to create a managed identity, including Azure CLI, Terraform, Bicep, and the Azure Portal. Personally, I always prefer using Terraform.
module "naming" {
  source = "Azure/naming/azurerm"
}

resource "azurerm_resource_group" "this" {
  name     = module.naming.resource_group.name_unique
  location = "Poland Central"
}

resource "azurerm_user_assigned_identity" "this" {
  location            = azurerm_resource_group.this.location
  name                = module.naming.user_assigned_identity.name_unique
  resource_group_name = azurerm_resource_group.this.name
}
Key Vault
Once you integrate your application with Key Vault you can probably call it a day. This way you will remove credentials from code and increase security, and fortunately most PaaS services has Key Vault integration built-in! (Container Instances is missing this feature 😔)
Let’s create a Key Vault and assign Read permissions to the identity we created before, by granting Key Vault Secrets User role.
terraform {
  required_providers {
    azurerm = {
      source  = "hashicorp/azurerm"
      version = "3.113.0"
    }
    random = {
      source  = "hashicorp/random"
      version = "3.6.3"
    }
  }
}

provider "azurerm" {
  features {}
}

data "azurerm_client_config" "current" {}

module "naming" {
  source = "Azure/naming/azurerm"
}

resource "random_password" "this" {
  length           = 16
  special          = true
  override_special = "!#$%&*()-_=+[]{}<>:?"
}

resource "azurerm_resource_group" "this" {
  name     = module.naming.resource_group.name_unique
  location = "Poland Central"
}

resource "azurerm_user_assigned_identity" "this" {
  location            = azurerm_resource_group.this.location
  name                = module.naming.user_assigned_identity.name_unique
  resource_group_name = azurerm_resource_group.this.name
}

resource "azurerm_key_vault" "this" {
  name                      = module.naming.key_vault.name_unique
  location                  = azurerm_resource_group.this.location
  resource_group_name       = azurerm_resource_group.this.name
  tenant_id                 = data.azurerm_client_config.current.tenant_id
  enable_rbac_authorization = true

  sku_name = "standard"
}

resource "azurerm_role_assignment" "this" {
  principal_id                     = azurerm_user_assigned_identity.this.principal_id
  scope                            = azurerm_key_vault.this.id
  role_definition_name             = "Key Vault Secrets User"
  skip_service_principal_aad_check = true
}

resource "azurerm_key_vault_secret" "this" {
  name         = "ECHO-TEXT"
  value        = random_password.password.result
  key_vault_id = azurerm_key_vault.this.id
}
Azure App Services
After assigning either a system-assigned or user-assigned managed identity to an Azure App Service with at least Key Vault Secrets User permissions, you can use special environment variables to reference secret values from Key Vault via the connected managed identity.
These special variables can be defined using a secret URI or specific parameters. You also have the option to reference an exact secret version, or omit the version to always use the latest one. However, when using the latest version, be aware of the caching mechanism: by default, secret values are cached for 24 hours. You can manually refresh the cache after updating secret values or trigger a refresh from the Azure portal.
With secret URI - latest:
@Microsoft.KeyVault(SecretUri=https://myvault.vault.azure.net/secrets/mysecret/)
With secret URI - exact version defined in last part of the URI:
@Microsoft.KeyVault(SecretUri=https://myvault.vault.azure.net/secrets/mysecret/secret-version-identifier)
With parameters - latest:
@Microsoft.KeyVault(VaultName=myvault;SecretName=mysecret)
With parameters - exact version defined in SecretVersion value
@Microsoft.KeyVault(VaultName=myvault;SecretName=mysecret;SecretVersion=secret-version-identifier)
terraform {
  required_providers {
    azurerm = {
      source  = "hashicorp/azurerm"
      version = "3.113.0"
    }
    random = {
      source  = "hashicorp/random"
      version = "3.6.3"
    }
  }
}

provider "azurerm" {
  features {}
}

data "azurerm_client_config" "current" {}

module "naming" {
  source = "Azure/naming/azurerm"
}

resource "random_password" "this" {
  length           = 16
  special          = true
  override_special = "!#$%&*()-_=+[]{}<>:?"
}

resource "azurerm_resource_group" "this" {
  name     = module.naming.resource_group.name_unique
  location = "Poland Central"
}

resource "azurerm_user_assigned_identity" "this" {
  location            = azurerm_resource_group.this.location
  name                = module.naming.user_assigned_identity.name_unique
  resource_group_name = azurerm_resource_group.this.name
}

resource "azurerm_key_vault" "this" {
  name                      = module.naming.key_vault.name_unique
  location                  = azurerm_resource_group.this.location
  resource_group_name       = azurerm_resource_group.this.name
  tenant_id                 = data.azurerm_client_config.current.tenant_id
  enable_rbac_authorization = true

  sku_name = "standard"
}

resource "azurerm_key_vault_secret" "this" {
  name         = "ECHO-TEXT"
  value        = random_password.password.result
  key_vault_id = azurerm_key_vault.this.id
}

resource "azurerm_role_assignment" "this" {
  principal_id                     = azurerm_user_assigned_identity.this.principal_id
  scope                            = azurerm_key_vault.this.id
  role_definition_name             = "Key Vault Secrets User"
  skip_service_principal_aad_check = true
}

resource "azurerm_service_plan" "this" {
  name                = module.naming.app_service_plan.name_unique
  resource_group_name = azurerm_resource_group.this.name
  location            = azurerm_resource_group.this.location
  os_type             = "Linux"
  sku_name            = "P1v2"
}

resource "azurerm_linux_web_app" "this" {
  name                = module.naming.app_service.name_unique
  resource_group_name = azurerm_resource_group.this.name
  location            = azurerm_service_plan.this.location
  service_plan_id     = azurerm_service_plan.this.id

  app_settings = {
    WEBSITES_PORT = "5678"
    ECHO_TEXT     = "@Microsoft.KeyVault(VaultName=${azurerm_key_vault.this.name};SecretName=${azurerm_key_vault_secret.this.name})"
  }
  key_vault_reference_identity_id = azurerm_user_assigned_identity.this.id

  identity {
    type         = "UserAssigned"
    identity_ids = [azurerm_user_assigned_identity.this.id]
  }

  site_config {
    application_stack {
      docker_image_name = "hashicorp/http-echo:1.0.0"
    }
  }
}
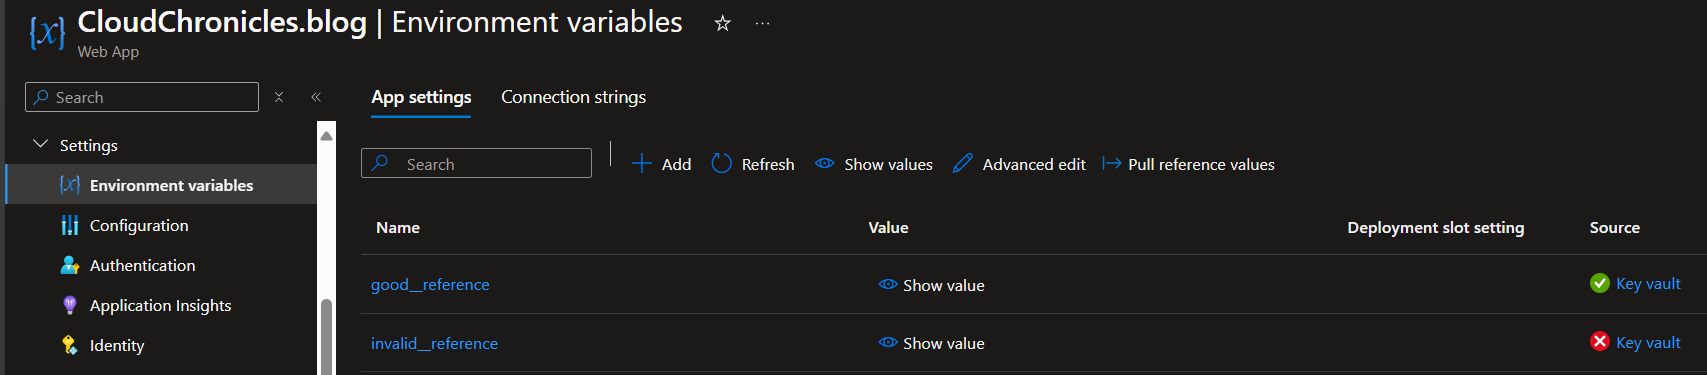
You can check the status of your secret references in the Azure portal. A green check mark means everything is functioning correctly, a red cross indicates an issue with permissions or the reference string, and a blue icon means data retrieval is still in progress.
As with any environment variable, applying changes requires an application restart. Keep in mind there might be a slight delay between saving the configuration or changing environment variables and seeing the changes reflected in your application.
Kubernetes / AKS / EKS / GKE
In Kubernetes, you can integrate your cluster with Key Vault using the CSI provider. This allows the cluster to expose specific secrets to containers via volume mapping and/or environment variables without needing to modify a single line of code. While the initial setup is a bit more complex, once configured at the cluster level, you can easily reuse this mechanism for any pod you want to integrate with Key Vault!
First, you need to enable the Azure Key Vault Secrets Provider add-on. This can be done through the CLI, portal, by adding parameters to your infrastructure code, or via kubectl/Helm chart: Azure Key Vault CSI Driver - helm Installation.
resource "azurerm_resource_group" "this" {
  name     = "rg-name"
  location = "Poland Central"
}

resource "azurerm_kubernetes_cluster" "this" {
  name                = "aks-cluster-name"
  location            = azurerm_resource_group.this.location
  resource_group_name = azurerm_resource_group.this.name
...
  key_vault_secrets_provider = {
    secret_rotation_enabled = true
  }
...
)
After enabling the Secrets Store CSI Driver through Azure (via CLI, Portal, or Terraform), AKS will create and assign a new user-assigned managed identity to the node pools, named azurekeyvaultsecretsprovider-<clustername>. While you can use a different managed identity, there is no way to specify a custom name or prevent the creation of this identity when enabling the feature via the AKS extension. The identity will be placed in the AKS node resource group along with other AKS-managed resources. However, if you enable it using Helm, no additional resources will be created.
Once CSI is enabled, the driver and provider pods will be installed on each cluster node.
kubectl get pods -n kube-system -l 'app in (secrets-store-csi-driver,secrets-store-provider-azure)'
NOTE: namespace might be different depending on the way of installation for example when installing with helm,
NAME                                     READY   STATUS    RESTARTS   AGE
aks-secrets-store-csi-driver-4vpkj       3/3     Running   2          4m25s
aks-secrets-store-csi-driver-ctjq6       3/3     Running   2          4m21s
aks-secrets-store-csi-driver-tlvlq       3/3     Running   2          4m24s
aks-secrets-store-provider-azure-5p4nb   1/1     Running   0          4m21s
aks-secrets-store-provider-azure-6pqmv   1/1     Running   0          4m24s
aks-secrets-store-provider-azure-f5qlm   1/1     Running   0          4m25s
At this point, you can start referencing secrets from Key Vault in your Kubernetes deployments.
First, you need to create a SecretProviderClass definition. The secretObjects section is optional if you only want to expose secrets via volume mounts. However, if you want to create a Kubernetes secret object that can later be used as an environment variable for your containers, you’ll need to include it.
apiVersion: secrets-store.csi.x-k8s.io/v1
kind: SecretProviderClass
metadata:
  name: ${SECRET_PROVIDER_CLASS_NAME} # needs to be unique per namespace. My recommendation is "azure-kv-${KEYVAULT_NAME}"
spec:
  provider: azure
  secretObjects:
    - secretName: echo-text
      type: Opaque
      data:
        - objectName: echo-text
          key: echo-text
  parameters:
    clientID: "${USER_ASSIGNED_CLIENT_ID}" # Setting this to use workload identity
    keyvaultName: ${KEYVAULT_NAME}         # Set to the name of your key vault
    tenantId: "${IDENTITY_TENANT}"         # The tenant ID of the key vault
    objects:  |
      array:
        - |
          objectName: echo-text # Set to the name of your secret saved in Azure Key Vault
          objectType: secret    # object types: secret, key, or cert
          objectVersion: ""     # [OPTIONAL] object versions, default to latest if empty
The Service Account is used by Workload Identity mechanism.
apiVersion: v1
kind: ServiceAccount
metadata:
  name: ${SERVICE_ACCOUNT_NAME}
  annotations:
    azure.workload.identity/client-id: "${USER_ASSIGNED_CLIENT_ID}"
If you don’t want to use environment variables then env section is optional here.
kind: Pod
apiVersion: v1
metadata:
  name: http-echo
  labels:
    azure.workload.identity/use: "true"
spec:
  serviceAccountName: ${SERVICE_ACCOUNT_NAME} # Must be the same as service account name created ealier
  containers:
    - name: http-echo
      image: hashicorp/http-echo:1.0.0
      env:
      - name: ECHO_TEXT # This name will be used as environment variable name
        valueFrom:
          secretKeyRef:
            name: echo-text
            key: echo-text
      volumeMounts:
      - name: secrets # Must be set to the name from volumes section.
        mountPath: "/mnt/secrets"
        readOnly: true
  volumes:
    - name: secrets
      csi:
        driver: secrets-store.csi.k8s.io
        readOnly: true
        volumeAttributes:
          secretProviderClass: ${SECRET_PROVIDER_CLASS_NAME} # Must be set to the secretProviderClass name created ealier
Container Apps
There are many similarities between configuring Key Vault integration for App Services via the portal and configuring it for AKS using code.
First, you need to create and assign a managed identity—either system-assigned or user-assigned. Then, create a reference to the secret at the application level. Once that’s done, you’ll need to decide how to expose the referenced value to your application. You can either use environment variables or mount the secrets as a shared volume, just like in Kubernetes.
Personally, I prefer environment variables since they are tightly coupled with the pod. However, many people prefer using ConfigMaps to separate the application from its configuration, allowing for easier management and updates without redeploying the pods. Ultimately, the best choice depends on your specific case and how you’re currently managing configuration. I recommend using the same method you’re already using for your existing configuration.
terraform {
  required_providers {
    azurerm = {
      source  = "hashicorp/azurerm"
      version = "3.113.0"
    }
    random = {
      source  = "hashicorp/random"
      version = "3.6.3"
    }
  }
}

provider "azurerm" {
  features {}
}

data "azurerm_client_config" "current" {}

module "naming" {
  source = "Azure/naming/azurerm"
}

resource "random_password" "this" {
  length           = 16
  special          = true
  override_special = "!#$%&*()-_=+[]{}<>:?"
}

resource "azurerm_resource_group" "this" {
  name     = module.naming.resource_group.name_unique
  location = "Poland Central"
}

resource "azurerm_user_assigned_identity" "this" {
  location            = azurerm_resource_group.this.location
  name                = module.naming.user_assigned_identity.name_unique
  resource_group_name = azurerm_resource_group.this.name
}

resource "azurerm_key_vault" "this" {
  name                      = module.naming.key_vault.name_unique
  location                  = azurerm_resource_group.this.location
  resource_group_name       = azurerm_resource_group.this.name
  tenant_id                 = data.azurerm_client_config.current.tenant_id
  enable_rbac_authorization = true

  sku_name = "standard"
}

resource "azurerm_key_vault_secret" "this" {
  name         = "ECHO-TEXT"
  value        = random_password.this.result
  key_vault_id = azurerm_key_vault.this.id
}

resource "azurerm_role_assignment" "this" {
  principal_id                     = azurerm_user_assigned_identity.this.principal_id
  scope                            = azurerm_key_vault.this.id
  role_definition_name             = "Key Vault Secrets User"
  skip_service_principal_aad_check = true
}

resource "azurerm_container_app_environment" "this" {
  name                = module.naming.container_app_environment.name_unique
  location            = azurerm_resource_group.this.location
  resource_group_name = azurerm_resource_group.this.name
}

resource "azurerm_container_app" "this" {
  name                         = module.naming.container_app.name_unique
  container_app_environment_id = azurerm_container_app_environment.this.id
  resource_group_name          = azurerm_resource_group.this.name
  revision_mode                = "Single"

  template {
    container {
      name   = module.naming.container_app.name_unique
      image  = "hashicorp/http-echo:1.0.0"
      cpu    = 0.25
      memory = "0.5Gi"

      env { # if you want to add secret as environment variable
        name        = "ECHO_TEXT"
        secret_name = "${module.naming.container_app.name_unique}-echo-text"
      }

      volume_mounts { # if you want to mount secrets as files
        name = "secrets"
        path = "/mnt/secrets"
      }
    }

    volume { # if you want to mount secrets as files
      name         = "secrets"
      storage_type = "Secret"
    }
  }

  identity {
    type         = "UserAssigned"
    identity_ids = [azurerm_user_assigned_identity.this.id]
  }

  secret {
    name                = "${module.naming.container_app.name_unique}-echo-text"
    identity            = azurerm_user_assigned_identity.this.id
    key_vault_secret_id = azurerm_key_vault_secret.this.id
  }

  ingress {
    external_enabled = true
    target_port      = 5678
    traffic_weight {
      percentage      = 100
      latest_revision = true
    }
  }
}
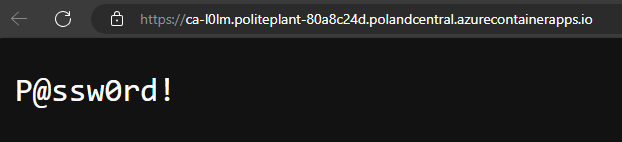
In case you use mounted volume, the value will be available in /mnt/secrets/<secret-name> text file, but you need to implement your own logic to use the values. If you want to always use latest value from the keyvault, than change key_vault_secret_id value from azurerm_key_vault_secret.this.id to azurerm_key_vault_secret.this.versionless_id.
An updated or deleted secret doesn’t automatically get updated in your application. You can force application to get changes by deploying a new revision or restarting existing one.
Azure SQL Databases
The most important goal is to secure our data. While you can store passwords in Key Vault and access them using the methods mentioned above, a more secure approach is available. Azure SQL offers passwordless authentication by using managed identities, which completely eliminates the need for passwords.
With Azure SQL, you can use a managed identity connected to your application to authenticate, making it a better and more secure option. Passwordless authentication is built into most libraries, so you simply need to link your service whether running on AKS, App Services, Azure VM, or elsewhere and replace your credentials in the connection string with the appropriate authentication method. For .NET applications, you will use Authentication=Active Directory Default, and for others you will often use Authentication=ActiveDirectoryMSI. The SQL library will handle the authentication process without requiring changes to your code.
Permissions
After creating a Managed Identity and connecting it to your application as described, you need to assign the appropriate roles to the identity. Many setups I’ve encountered use default administrator credentials, so if you want to replicate this level of access, you should grant the db_owner role to your identity.
You can assign this role through the Azure portal by setting your identity or a group containing the identity as a Microsoft Entra admin.

However, this approach introduces the risk of someone changing these permissions in the portal and making your application unable to connect to the database, so I recommend using below commands.
ALTER ROLE db_owner ADD MEMBER [<identity-name>];
If you want to follow least priviledge approach, then you should grant only permissions that are required by your application.
CREATE USER [<identity-name>] FROM EXTERNAL PROVIDER;
ALTER ROLE db_datareader ADD MEMBER [<identity-name>];
ALTER ROLE db_datawriter ADD MEMBER [<identity-name>];
GRANT SELECT ON [<table-name>] TO [<identity-name>];
jdbc
jdbc:sqlserver://example-azsql-server.database.windows.net:1433;database=example-database;encrypt=true;trustServerCertificate=false;hostNameInCertificate=*.database.windows.net;loginTimeout=30;Authentication=ActiveDirectoryIntegrated
odbc
Driver={ODBC Driver 18 for SQL Server};Server=tcp:example-azsql-server.database.windows.net,1433;Database=example-database;Uid={your_user_name};Encrypt=yes;TrustServerCertificate=no;Connection Timeout=30;Authentication=ActiveDirectoryIntegrated
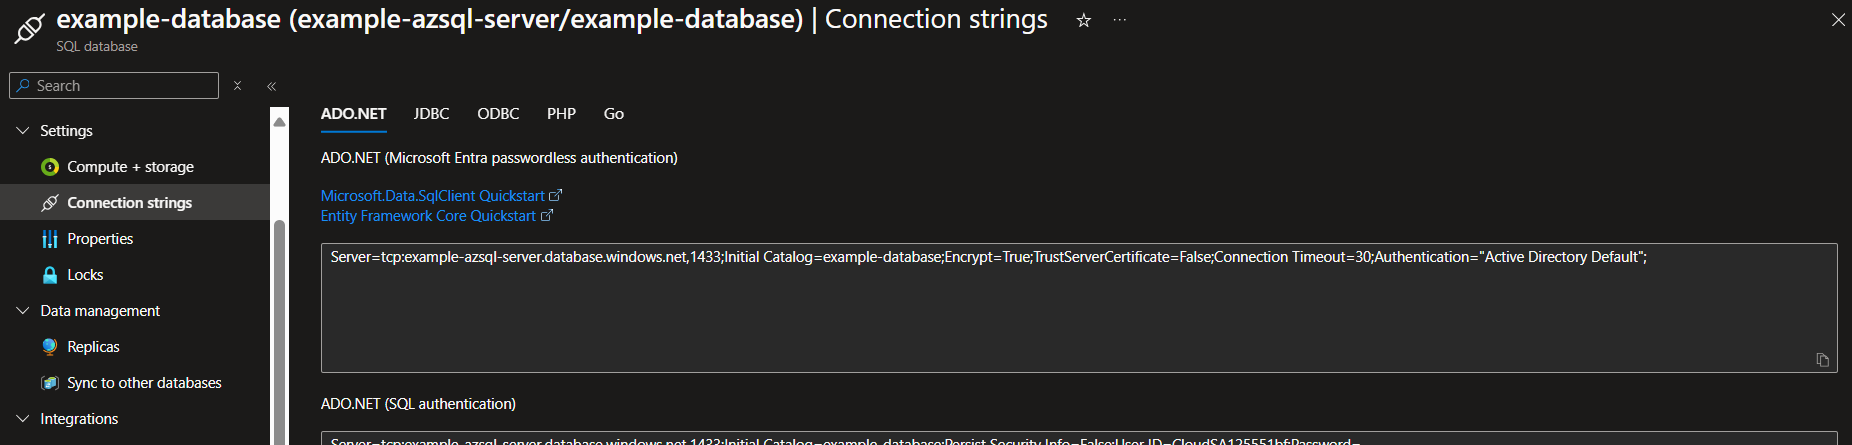
ADO.NET
Server=tcp:example-azsql-server.database.windows.net,1433;Initial Catalog=example-database;Encrypt=True;TrustServerCertificate=False;Connection Timeout=30;Authentication="Active Directory Default";
You can find those connection strings in database connections tab.
If your library does not support passwordless authentication natively, you will need to retrieve a token from the MSI endpoint and implement your own logic to connect to the service.
Conclusion
In summary, integrating Azure Key Vault with your applications and using managed identities improves security by eliminating the need for passwords in the configuration. You can implement above techniques to improve security in legacy systems or cloud-agnostic setups where using AzureSDK might not be an option to integrate with certain services.