Bringing Open Source Security to Azure DevOps and GitHub Actions with Trivy
Introduction
As businesses use DevOps more and more, it’s super important to make sure security is a part of it all. One way to do this is to add security tools to the pipeline that builds and deploys our code (the CI/CD pipeline). In this post, we’ll talk about how to add Trivy to this pipeline to make things more secure.
What is Trivy?
Trivy is a tool that’s free for anyone to use (open-source) that finds security issues. It’s really good at checking container images, Kubernetes files, and code repositories. It’s not hard to use and doesn’t slow things down, making it a top pick for checking container images and codebase during the CI/CD process. Trivy can look for issues in the software that runs the operating system, the software our application depends on, and even common mistakes in Dockerfiles.
Targets - What Trivy can scan
- Container Images
- Filesystems
- Git Repositories (remote)
- Virtual Machine Images
- Kubernetes
- AWS
Scanners - What Trivy can find
- OS packages and software dependencies (SBOM)
- Known vulnerabilities (CVEs)
- Infrastructure as Code (IaC)
- issues and misconfigurations
- Sensitive information like secrets and certificates
- Software licenses
Integrating Trivy into the CI/CD process
The market is filled with similar products, both free and paid. However, based on my research and firsthand experience with setting up a complete development workflow from scratch, Trivy stands out with its robust functionality, popularity in terms of GitHub project stars, and ongoing community contributions. This ensures the tool’s constant evolution and provides a community support in case of any issues.
To incorporate Trivy into the CI/CD process, we can use CLI tools in our pipeline or readily available steps in systems like GitHub Actions or Azure Pipelines. Using the CLI to craft your own steps offers greater flexibility and lets you replicate the entire scanning process on your local machine, aiding in debugging or early problem detection by integrating the same set of commands into your Git prehook. For those who prefer a GUI-based approach, an extension for Visual Studio Code is available.
Where to place Trivy
In the realm of CI/CD, the general rule is “the sooner, the better”. Hence, static analysis security tools (SAST) should be integrated into your continuous integration process, ideally after each commit to a branch that will subsequently merge into your main branch. Trivy can even be added to pre-commit hooks. This shift-left approach enables developers to detect and address problems before they’re deployed to production or even before changes are committed to the remote repository.
For legacy projects in maintenance mode with infrequent builds, you can set these tools to run daily or weekly scans on your project to check for any newly emerged vulnerabilities. Personally, in my pipelines, I always add Trivy and Checkov (which will be discussed in a future article) as the first steps in the CI pipeline, and then perform a Trivy container scan after the Docker build is complete. You may wonder why I am splitting codebase scan from container scan. As I mentioned “the sooner, the better”, so if there will be any problems found in code it will be reported within seconds, while in most cases it takes at least 1-2 minutes to build container image.
Now, let’s walk through an example of integrating Trivy into a CI pipeline:
Azure DevOps Pipeline
The first step involves scanning the entire repository. The following step triggers security scans (vuln, config, secret) on our repo. This way, we can detect private keys, vulnerable packages used in code, and misconfigurations in files like Dockerfiles or IaC templates. This should be executed as early as possible.
Here’s an example of how to add this to your Azure DevOps Pipeline, along with a brief explanation of what each input does:
- task: trivy@1
  displayName: Scan repo with trivy 🩻
  inputs:
    path: ${{ parameters.trivyScanPath }}
    exitCode: $(trivyExitCode)
    docker: false
    version: '${{ parameters.trivyVersion }}'
Trivy is being used from the marketplace as trivy@1. The displayName is a label that you can customize. In the inputs section, you see that docker is set to false, meaning we’re using Trivy as a standalone tool, not as a Docker image. That’s because of some limitations in Azure Pipelines.
The exitCode decides whether Trivy will stop everything if it finds a problem (1 means stop, 0 means keep going). To begin, set it to 0 so your whole project doesn’t get stopped by a single issue. Once you’ve fixed any problems, you can switch it to 1 so Trivy will stop if it finds a new issue in the future.
The version lets you pick which version of Trivy you want to use.
path defines the path in repository to be scanned. Useful if running in monorepo or when you want to scan certain folder instead of all files in repo.
To avoid redundancy and keep the code clean there are some parameters used in inputs. To run same set of tasks for each service whole build process is contained in reusable pipeline, but if you don’t use reusable pipelines below steps are still valid.
parameters:
- name: agentVersion
  type: string
  default: 'ubuntu-20.04'
- name: trivyVersion
  type: string
  default: 'v0.38.1'
- name: trivyScanPath
  type: string
  default: '.'
- name: trivySoftFail
  type: boolean
  default: true

jobs:
- job: Build
  displayName: Build
  pool:
    vmImage: ${{ parameters.agentVersion }}

  steps:
  - task: PowerShell@2
    displayName: 'Set variables'
    inputs:
      targetType: 'inline'
      script: |
        if ([System.Convert]::ToBoolean("${{ parameters.trivySoftFail }}"))
        {
          Write-Host "##vso[task.setvariable variable=trivyExitCode]0"
        }
        else
        {
          Write-Host "##vso[task.setvariable variable=trivyExitCode]1"
        }

  - task: trivy@1
    displayName: Scan repo with trivy 🩻
    inputs:
      path: ${{ parameters.trivyScanPath }}
      exitCode: $(trivyExitCode)
      docker: false
      version: '${{ parameters.trivyVersion }}'
As you can see there is also PowerShell script which translates boolean parameter input to exit code. If you don’t like it you can for example rename variable to trivyExitCode and pass 1 or 0 without any scripts.
And if you are using Docker images here’s how to add Trivy to your Docker image scan after the build process. For example it can detect vulnerabilities in linux packages used in base image.
- task: Docker@2
  displayName: build docker container 🐋
  inputs:
    repository: "$(dockerImageName)"
    command: 'build'
    Dockerfile: '${{ parameters.dockerfilePath }}'
    tags: '$(Build.SourceVersion)'

- task: trivy@1
  displayName: Scan container image for vulnerabilities 🩻
  inputs:
    image: '$(dockerImageName):$(Build.SourceVersion)'
    exitCode: $(trivyExitCode)
    docker: false
    version: '${{ parameters.trivyVersion }}'
The only difference is that I am using image instead of path. image is the name and tag of the Docker image you just built.
This is what the results will look like:
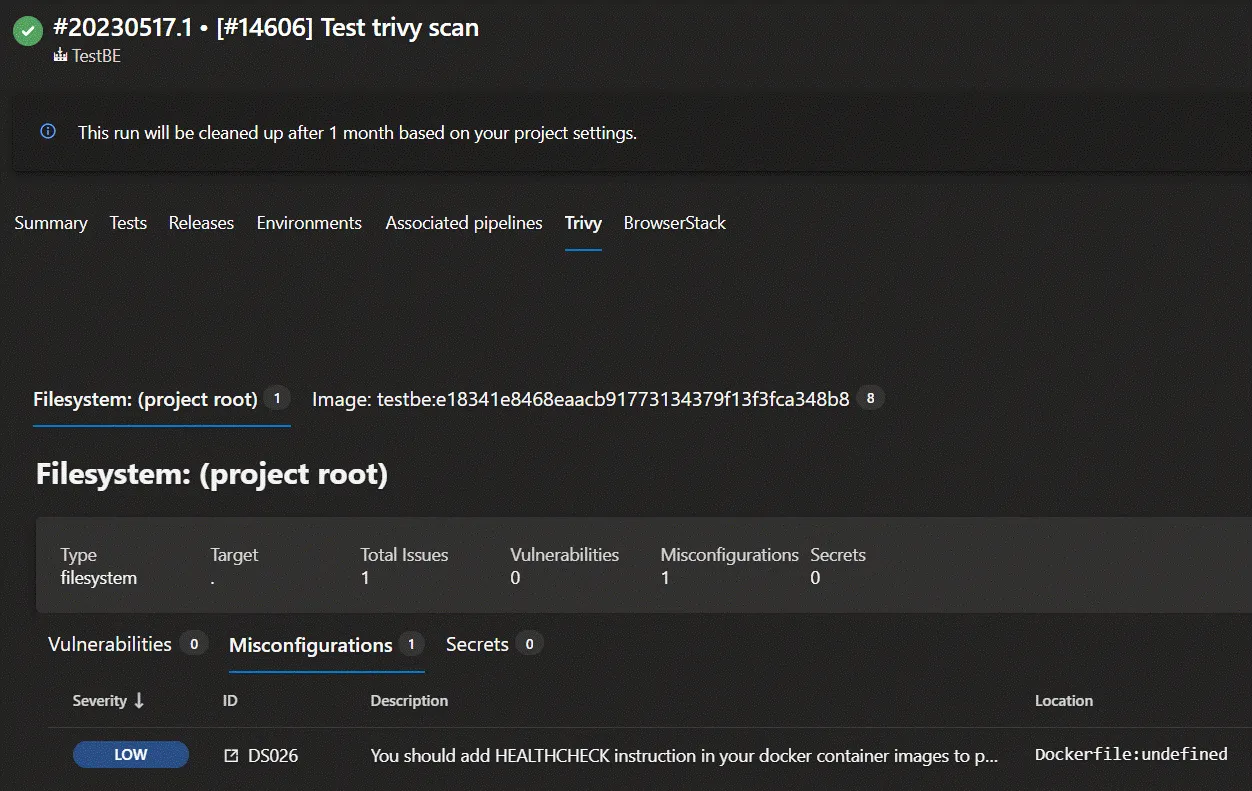 Trivy repository scan output
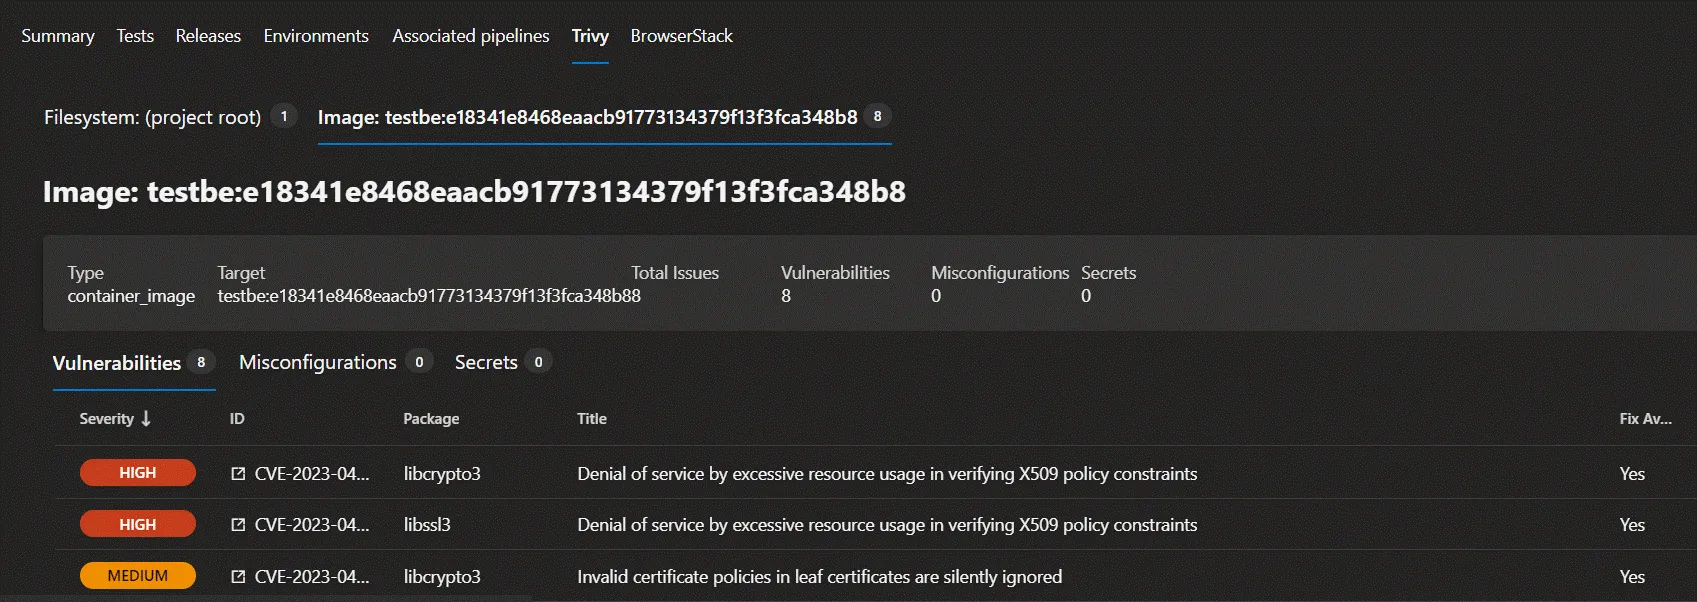 Trivy docker image scan output
GitHub Actions Workflow
In GitHub to better reuse my code, I created a composite action.
name: 'Scan with Trivy for vulnerabilities'

inputs:
  checkName:
    description: 'A name for the check result.'
    required: false
    default: 'Trivy scan results'
  severity:
    description: 'Severities of security issues to be displayed.'
    required: false
    default: 'CRITICAL,HIGH,MEDIUM'
  securityChecks:
    description: 'Comma-separated list of what security issues to detect (vuln,secret,config).'
    required: false
    default: 'vuln,config,secret'
  softFail:
    description: 'Specify if scanning soft fail is enabled.'
    required: false
    default: true

  scanPath:
    description: 'Specify scan path for filesystem scan'
    required: false
    default: '.'
  dockerImageName:
    description: 'Specify docker image name to be scanned'
    required: false

runs:
  using: "composite"
  steps:
    - name: Set variables
      shell: pwsh
      run: |
        if ([System.Convert]::ToBoolean("${{ inputs.softFail }}")) {
          Add-Content -Path $env:GITHUB_ENV -Value "trivyExitCode=0"
        }else {
          Add-Content -Path $env:GITHUB_ENV -Value "trivyExitCode=1"
        }

    - name: Scan filesystem for vulnerabilities
      uses: aquasecurity/trivy-action@0.10.0
      if: ${{ inputs.dockerImageName == '' }}
      with:
        scan-type: 'fs'
        scan-ref: '${{ inputs.scanPath }}'
        format: 'template'
        template: '@/contrib/junit.tpl'
        output: 'trivy-junit-results.xml'
        exit-code: '${{ env.trivyExitCode }}'
        severity: '${{ inputs.severity }}'
        security-checks: '${{ inputs.securityChecks }}'

    - name: Scan container image for vulnerabilities
      uses: aquasecurity/trivy-action@0.10.0
      if: ${{ inputs.dockerImageName != '' }}
      with:
        image-ref: '${{ inputs.dockerImageName }}'
        format: 'template'
        template: '@/contrib/junit.tpl'
        output: 'trivy-junit-results.xml'
        exit-code: '${{ env.trivyExitCode }}'
        vuln-type: 'os,library'
        severity: '${{ inputs.severity }}'
        security-checks: '${{ inputs.securityChecks }}'

    - name: Publish scan results
      uses: EnricoMi/publish-unit-test-result-action@v2
      if: always()
      with:
        check_name: '${{ inputs.checkName }}'
        fail_on: 'nothing'
        report_individual_runs: true
        files: |
          trivy-junit-results.xml
This is a composite GitHub Action designed to scan your project with Trivy for vulnerabilities. It has two main parts: scanning the filesystem and scanning a container image for vulnerabilities. The results are then published. Here’s a breakdown of the action:
Inputs define the parameters that can be passed to the action when it’s used in a workflow.
-
checkNameis a string that represents the name of the check result. It defaults to ‘Trivy scan results’. -
severityspecifies the severities of security issues to be displayed. It defaults to ‘CRITICAL,HIGH,MEDIUM’. -
securityChecksspecifies what types of security issues to detect (vulnerability, configuration, secret). It defaults to ‘vuln,config,secret’. -
softFailis a boolean that defines whether the action should fail softly (i.e., not cause the entire workflow to fail) when it encounters a vulnerability. It defaults to ‘true’ which is converted then to0or1exit code. -
scanPathis a string that defines the filesystem path to scan. It defaults to ‘.’ (the current directory). -
dockerImageNameis a string that specifies the name of the Docker image to scan. It’s optional and controls if filesystem or docker image scan should be performed.
Steps define the sequence of tasks to be performed by the action.
Set variables: This step sets a variable called
trivyExitCodebased on thesoftFailinput. IfsoftFailis ‘true’,trivyExitCodeis set to0. Otherwise, it’s set to1. Like I mentioned in Azure DevOps Pipeline part this can be handled different way.Scan filesystem for vulnerabilities: This step runs the Trivy GitHub Action to scan the filesystem for vulnerabilities. It only runs if
dockerImageNameinput is not provided. The parameters for the scan, like the severity level, type of checks to be performed, and exit code, are taken from the inputs.Scan container image for vulnerabilities: This step also runs the Trivy GitHub Action, but this time to scan a Docker container image for vulnerabilities. It only runs if
dockerImageNameinput is provided. The parameters for the scan are taken from the inputs.Publish scan results: This step uses the “publish-unit-test-result-action” GitHub Action to publish the results of the Trivy scans. This step will always execute, even if previous steps fail to ensure that results will be published to workflow summary even if we have
softFailset tofalse. It uses thecheckNameinput to set the name of the check result.
This composite action effectively encapsulates the process of running a Trivy scan against a filesystem and a Docker image, then publishing the results, all in a reusable GitHub Action that can be added to any GitHub workflow.
In order to use this action just call it from any step in your GitHub Workflow:
For Docker scan:
- name: Build docker image 🐋
  uses: docker/build-push-action@v4
  with:
    context: "${{ github.workspace }}"
    tags: "${{ env.dockerImageName }}:${{ github.sha }}"
    file: ${{ env.dockerfile }}

- name: Scan container image for vulnerabilities 🩻
  uses: Your-GitHub-Account-Name/Your-Repository-Name/.github/actions/trivy-scan@main
  id: image-scan
  with:
    checkName: 'Docker security scan result'
    dockerImageName: '${{ env.dockerImageName }}:${{ github.sha }}'
For filesystem scan:
- name: Scan filesystem for vulnerabilities 🩻
  uses: Your-GitHub-Account-Name/Your-Repository-Name/.github/actions/trivy-scan@main
  id: image-scan
  with:
    checkName: 'fs security scan result'
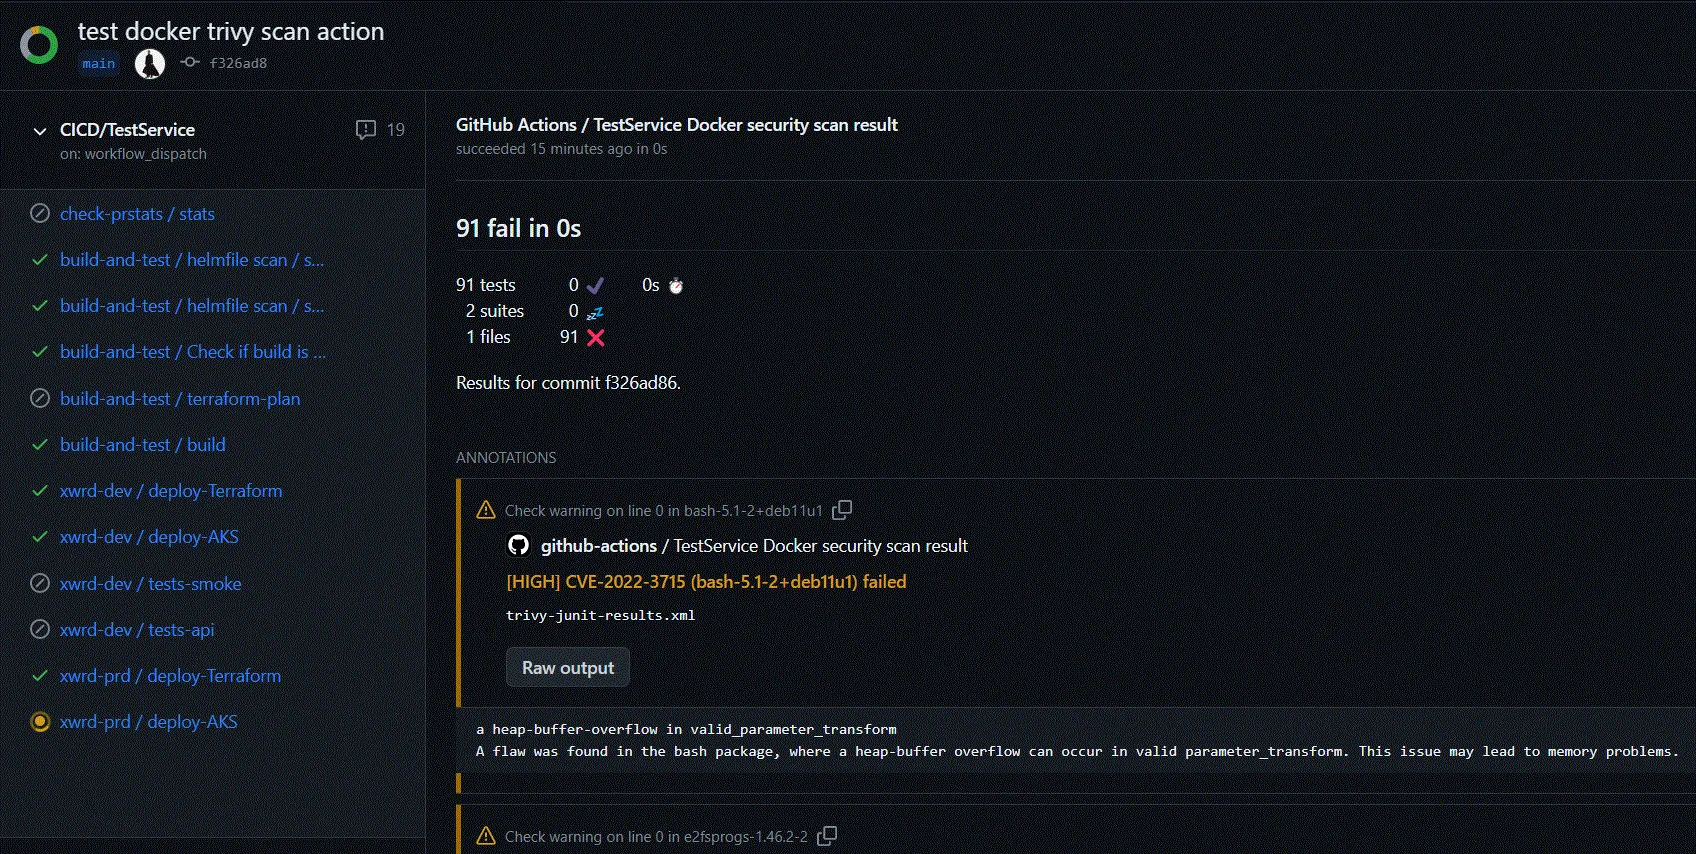
This is what the results will look like:
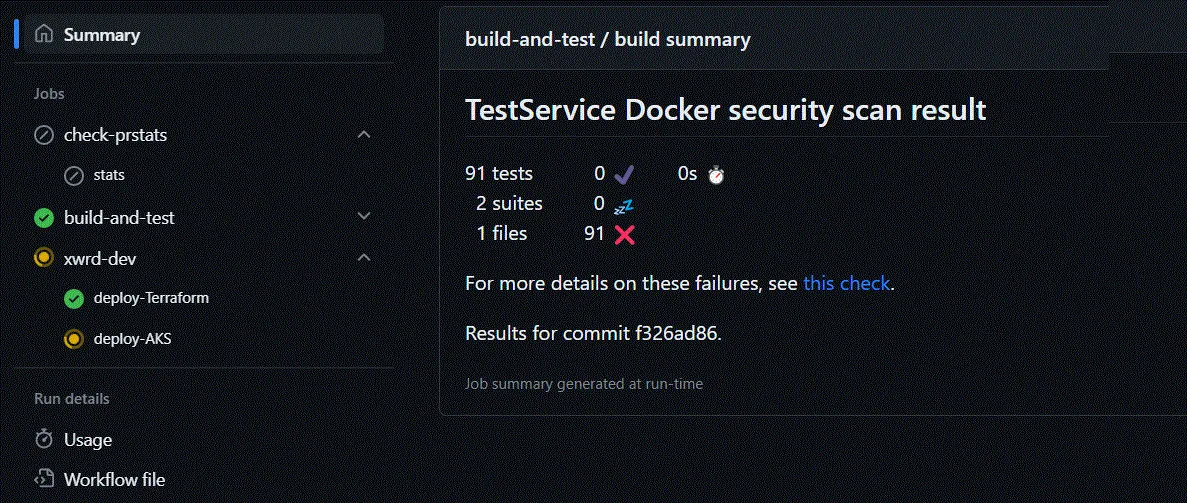 Trivy output in workflow summary - 91 errors found in built image
 Detailed output after clicking
 see this check - each error with explanation and corresponding CVE
Conclusion
Integrating Trivy, the open-source security tool, into your CI/CD pipeline can greatly enhance the security of your Azure DevOps and GitHub Actions workflows. Trivy’s ability to scan container images, filesystems, and Git repositories for security issues, and to spot misconfigurations, sensitive information, and software licenses, makes it an invaluable asset. The above examples demonstrate how to implement Trivy into Azure Pipelines and GitHub Actions, detailing the process for scanning both repositories and Docker images. This blog post proves the value of incorporating security tools like Trivy into your pipeline, enabling you to detect and address vulnerabilities promptly, ultimately resulting in safer and more reliable software.